


Underwater Transom Lights Troubleshooting
It’s spring, the peak of boat repair season, you’ve noticed moisture in your transom lights and now are searching for the perfect replacement lights. Once you decide on the perfect underwater transom light, you want to install it correctly, the first time. We’re avid boaters here at Plash, and we understand this is one of those repairs that we tried to avoid due to the time and difficulty of getting them replaced correctly. During installation, if one transom light shorts out, say from moisture intrusion, it will back-feed the circuit and kill all the other perfectly good lights. No one likes to have to do things twice, especially when it involves your boat.
Installing Underwater Transom Lights
In order to avoid circuit issues, you need to independently fuse each transom light just inside the hull. To avoid water intrusion, you need to make sure that you’re applying the sealant correctly and according to the manufacturer instructions written on the 3M package. During installation, use a light sanding or scouring pad to abrade the mounting surface and the surface of the boat. Next, use acetone and wipe down the mounting surface of the transom light and the surface of the boat. Apply your 3M sealant and let it cure. Sounds easy, however, this step is routinely skipped over and leads to malfunctions in the product.
Plash Technicians Tackle Moisture Intrusion
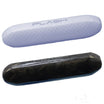
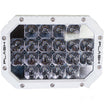
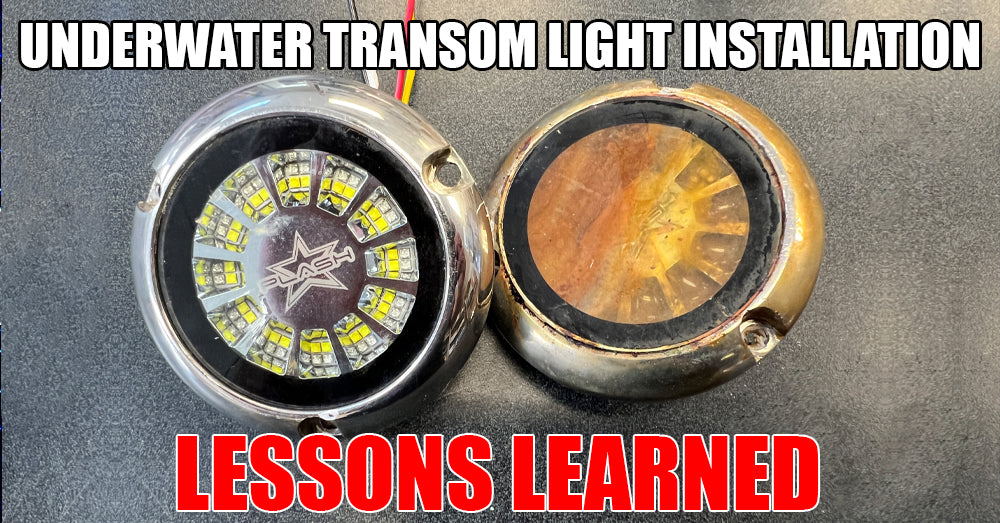
Recently, our team received seven warranty returns on our transom lights claiming moisture intrusion (picture below), two of which were completely water logged. This raised major concerns to myself and my team. Big concerns - the kind of concerns that keep one from sleeping at night.
"What have we done wrong? Is our transom light gasket not holding? Is the marine sealant failing for some reason? Was the transom light installed incorrectly? What is causing this underwater transom light mounted on a boat to fail? Should I cease all underwater light sales until this is resolved?" - These were the words playing over and over again in my head.
I immediately asked my Senior Technician to pull all of these returned lights out for us to review. Every single one of these returned lights were smooth stainless steel just like when they were sold. I thought this was odd because we clearly call out in our instructions to use 3M® 4200 Marine Sealant. Everyone knows that you have to seal a hole in your boat that is under the water line with marine sealant. Anyone who has used 3M® 4200 or 5200 knows that it adheres very well and is very strong. So, why is it not on the back of these lights? I would think you should have to take a grinder to remove the marine sealant. Something is not right. This led to me doing some in house testing, Plash Style. We all know engineers can't answer a question in a timely manner to save their lives, but I know our Plash team would figure it out quickly.
The components the Plash team uses are above average, if not premium, as we do not have LED failures or really any other issues except for water inside the fixture. It is safe to say that moisture intrusion generally is the culprit for all underwater light failures.
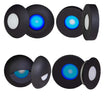
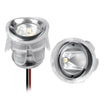
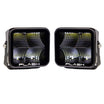
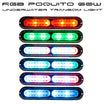
(Below is a pair of Poquito Transom Lights that were returned with moisture inside. You can see that the sealant did not adhere to the stainless steel housing.)
![]()
How does moisture get inside?
- Around the power wire, through the power wire, and even down the power wire from inside the vessel (if the wire was submerged in the bilge or something).
- From the lens, either at the gasket or through the lens itself.
- At the seal on the back plate
- Through the housing? (I'll leave this here, but highly unlikely)
- Not being properly sealed around the power wire during installation is the most common. (This is where I will spend most of my attention for the testing, because the evidence is in plain sight with the lack of sealant on the backside of the lights.)
- Heated metal expands, the lens does not. Using them out of water then dunking in cool water could be a cause. Just a thought.
- Poor sealant quality, air bubbles in sealant, or missing/lack of sealant at any of the possible seals. Is it possible the room had too much humidity when the housing where sealed and it compromised the integrity of the sealant? (It's a long shot, but worth noting)
- Damage to the lens, housing, or even to the wire.
- Deterioration (in any form and from any cause such as: UV, barnacles, corrosion, acetic, etc) of the lens, housing, wire, etc over time.
Now that we know the possible ways moisture can get inside, it's time to experiment and run some simple tests. I should note that these tests were performed indoors at 55%~65% humidity and 72°F~80°F ambient temperatures.
This is what I have found over the past few weeks with our in-house testing:
- Using the marine sealant that we have always recommended, 3M® 5200 or 3M® 5200 Fast Cure, I took 3 transom lights, and with no prep at all, I placed a bead around the power wire and waited 1 week to ensure it had cured. For this test, I even waited a week for the Fast Cure, too. I found that it did not not adhere to the stainless steel backplate. The sealant can literally be peeled off by hand.
Below is an image of the 3M® 5200 Fast Cure marine sealant not adhering to the stainless steel light housing due to it not being prepped correctly. It folds over like a pancake.

- I was shocked, to be quite honest, after I got the results from our testing above. I thought that this 3M® sealant would stick and hold just about anything, anywhere. It says you can use it underwater. Why didn't it adhere? So I went to Blackburn Marine Supply and spoke with the experts there. They suggested 2 things:

"Abrade AND Wipe clean with solvent (i.e. acetone, MEK)."
Here is a picture I took of the back of the tube. I underlined the important part in red. Sorry it is hard to read.

- So, with the information I had received, I went to do another round of testing using 3M® 4200 and 3M® 4200 Fast Cure along with 3M® 5200. I wanted to see if the 5200 would adhere to the stainless as well as the recommended 4200. I used the same 3 lights as my test samples. Using a light sanding or scouring pad to abrade the mounting surface, both the back of the light and the surface of the boat (ie fiberglass) would be required, but I only had the lights loose in hand for this test. After scuffing up the area, the next step is to ensure the back of the light and the surface of the boat is clean and free of debris, oils, grease, etc. To accomplish this, the mounting surface of light and surface of the boat needs to be wiped down with Acetone.Not alcohol or anything else. Acetone. All of this is listed in the instructions on the 3M package, but unfortunately, it often gets overlooked.
I let this sit and cure for 1 week.
Perfection. You will have to take a grinder to get the sealant off of the stainless steel! And this is with all 3 types of sealants I used.

That's all it was! So much work for one little tiny sentence in fine print on the package... "Abrade and Wipe clean with solvent (i.e. acetone, MEK)."
I think of all the time and effort spent. From scheduling the work, to pulling these boats out of the water, removing the lights, packaging and shipping them back, etc. All because the surface was not abraded and wiped clean with acetone.
FYI: We replaced every single light that was returned for warranty that failed from moisture by not being sealed correctly, free of charge. We also updated our instruction to clearly state "Abrade and Wipe clean with solvent (i.e. acetone)."
- - - - - - - - - - - - - - - - - -
Other items I have noted during these test:
- While our transom lights are currently potted from behind when assembled, they are not fully potted. Currently, we do not pot inside between the lens and the PCB (LED's). I will run some tests with some new & improved potting materials, and I hope to fully pot all of our underwater lights in the future.
4/15/2023: The tests were good. We now fully pot all underwater lights!
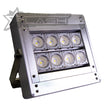
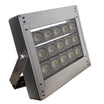
- Our older model lights, like the 60W Poquito and the 180W Grande, use a polycarbonate lens (PC). The PC lens does not stand up to the elements as well as borosilicate glass. In the future, we will only use borosilicate glass lenses like we currently use in the EPIK transom light model.
Plash Warranty
Warranties happen. Not everything works as intended every time... I get it. But it should be very minimal, almost null in my opinion. A warranty is provided by the manufacturer (in this case us, Plash) to protect the consumer. I am proud to offer a limited lifetime warranty, but I do not want to be in the warranty business. It is our goal to provide the highest quality products from day one. I'd say our warranty policy is in place for the "in case we mess up" or "in case a component of our product fails." It happens, human error. People get distracted. It's life. We put policies into place to reduce the amount of errors, a redundant system to verify that the final product is what we say it is. Testing and more testing! We do all of this so we do not have to burden our customer to find out the hard way. No one likes to have to do things twice, especially when it involves your boat.
I remember one time we had an Epik transom light returned for warranty and it was full of water. When we turned it over drip, drip, drip. Well there's the issue. That was easy. This light had been hit against something pretty hard at the corner, where the borosilicate glass lens meets the stainless steel housing, and there was just enough damage to compromise the gasket, but not damage the glass lens. But not all failures are this easy to find.
Another issue with transom lights is if one light shorts out, say from moisture intrusion, it will back-feed the circuit and kill all the other perfectly good lights. And this is why you independently fuse each transom light just inside the hull. My goal here is to prevent warranties! It's a simple goal, right? Do I need to use better components? Is there an assembly process that could be better? A curing process? Is the packaging more than adequate for shipping? etc etc.
Just so you know, I am not pointing fingers at anyone in particular (if I were pointing the finger, it would be pointed at me as I am the harshest critic). That is not the goal. Providing high-quality products that don’t need to be returned due to non-product installation errors, therefore negating the need of a “warranty”, is the goal.
REMINDER: If you do not remember anything from this article, remember this:
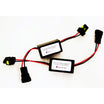
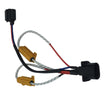
- Each transom light needs to be fused individually to prevent back feeding in case of failure. The fuse should be close to the power source, as always.
- Abrade and Wipe the mounting surface(s) clean with solvent (i.e. acetone).
I am glad to share my knowledge and experience in hopes of preventing failures for all. Thank you for reading.
Sincerely,
Stephen Plash

Leave a comment
This site is protected by reCAPTCHA and the Google Privacy Policy and Terms of Service apply.